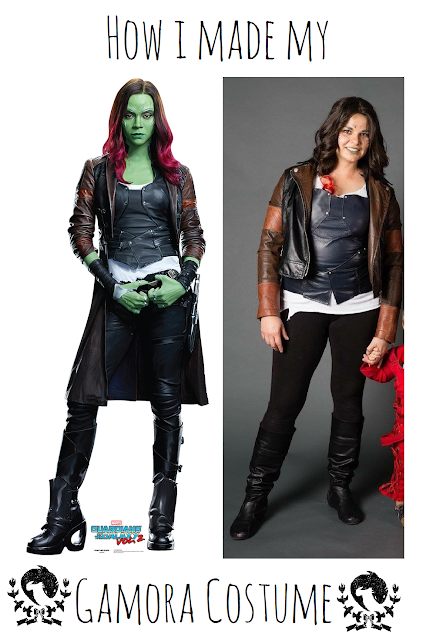
Go For a Gamora (costume)
I am fairly proud of this costume, because the leather
“vest” part is the first item I have made with some success without having
anything to copy. When I say that I mean I have made plenty of clothing items
by strategically folding and tracing pieces of clothing I already had, in
essence using that piece as a pattern. Not surprisingly I didn’t have anything
like that when I made the vest so I had to figure it out as I went. The key to
this was to have plenty of paper. You can buy big newsprint pads from Michaels,
Joann’s, or pretty much any art store for fairly cheap. I have a few but when I
made this they were in storage, so I used thin packing paper that came in a box
that was delivered to me.
To begin I had to take measurements of my body to ensure the
final result would fit me, I then drew the pieces of the vest to scale on the
paper. I only needed to draw half of the pieces because I would just cut two
out of my leather when the time came. If I had enough paper, I would have made
the entire thing out of paper first to see exactly how it would come together,
but I didn’t.
The trickiest part was the bust pieces. Because I have some
experience sewing I know that darts are one way that clothing designers add
dimension and make space for boobs, so I then drew darts into my bust pieces,
but soon learned it wasn’t as simple as that.
The first time I cut
them out of the paper and pinched the darts together like they would eventually
be when I sew them, I realized I had made it much too long on one side, and the
edge was uneven and awkward. I had to measure out the dart and adjust the angle
of the edge so that it would come together smoothly.
When I had gotten all pieces to a satisfactory size,
measuring and measuring again, (make sure if you do this you have a good
eraser!) I drew tabs on the pieces I would use to fold under or sew to
adjoining pieces. I wrote myself a note where I hadn’t left space to draw the
tab.
It was time to cut the pieces. Normally I work with cotton
or a more porous fabric and I would pin pattern pieces to them, this leather
would retain any pinpricks I made, so I opted to trace with sharpie on the
wrong side of the leather. (P.S. this is leather I got off a couch someone left
on the curb! One man’s trash….)
Once I had all my pieces cut out I folded and ironed all of
the tabs that would need to be sewn that way, which made it easier.
When I was ready to sew it all together I used masking tape
instead of pins to fit it together and then sew it just the way I wanted it to
be.
I made the sleeves after the main body. I got the general
shape of the sleeve from this tank top adjusting them to make them thicker. I
originally wanted the high collar, but it didn’t work out, which I am fine with
because this leather was a little too stiff to be comfortable around my neck.
I chose to do a lace up corset style back because I was
working on getting into shape and had high hopes and apprehensions about the
possibility of being thinner when Halloween rolls around, this way I could
adjust the sizing as needed. In any case I knew the back would be hidden by the
jacket most of the time. The eyelets came from Wal-mart , they were probably about $5, and I used a ball peen hammer to install them. I know you can buy special tools for that if you want to though.
The “rivets” are actually googly eyes I painted silver. I
actually used metallic nail polish on those, but the paint is chipping after
wearing it once, I my need to use something else next time. I glued them on
with E6000 glue which is currently my favorite glue. Fun story about it… When I
was student teaching the sole of my shoe started to fall off. The teacher
hooked me up with some of this glue and I bless her name every time I use it,
it is awesome.
To add the straps on the side I cut a little slit in the
leather, slid the strap through, and used a zigzag stitch on the sewing machine
to secure it.
My next step was the jacket. Beginning with a thrift store
jacket, I discovered that I could paint the pleather with a very thin layer of
acrylic paint without changing the feel of the material. It does rub/scratch
off a little, but not in a terribly noticeable way. I used the paint right out
of the tube and spread it on with a paintbrush in circular motions. I did two
layers in a few areas, but most of it was good with just one.
I used a light brown leather (also from a couch) to do the
arm bands and cuffs and I had a nice approximation of the jacket she wears in
the film.
The rest of the costume was covered by basics, a white tee
shirt cut up a little, black leggings, and boots I bought at the thrift store
when we did Star Trek last year. You can
barely see it in my picture, but I also got some clip-in hair extensions online
for $2.
All in all, I think the most expensive part of this costume
was the jacket, which was about $20. I had a lot of the materials I needed on
hand.
Thanks for reading!
If you liked this post, check out how our family costume turned out here:guardians of the galaxy family costume


Comments
Post a Comment