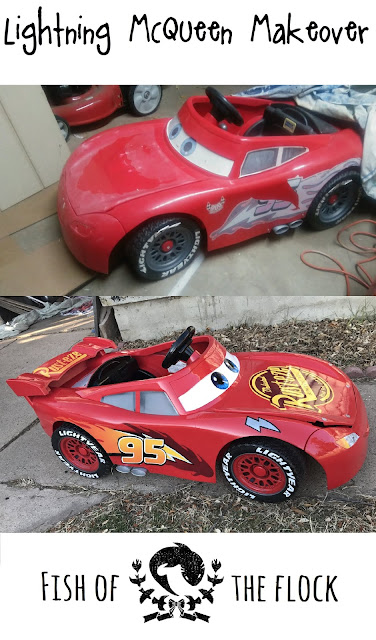
Lightning McQueen Makeover
My son is totally nuts for the Pixar Cars movies and last Christmas I wanted to really wow him with his own car he can drive around. I came across this car someone was selling on Facebook for about $50.
The stickers were faded, peeling, or gone altogether, but although it wasn't much to look at it was still sturdy, the battery was brand new, and it worked great. It cost much less than what I was seeing brand new at the store, and I knew I could spruce it up with some paint and my handy dandy Cricut machine. I started by getting rid of the sticker remnants and sanding the whole car to give it a little more tooth for the paint to adhere to.
I then painted the whole thing over with a fresh coat of red paint.
Using photos I could find online of McQueen's logos and an app called Sketchbook (which is free), I traced out the designs and ended up with layers which would then become the stencils for the car. I used cheap clear contact paper that I could pick up at Walmart to make stencils and a few cans of different colored spray paint.
I started with this big one on the hood.
I also made stencils for the sides
You can see I did an orange to yellow fade. When you are fading spray paint it is important to keep your can a good distance away from what you are spraying. It also helps to spray from an angle, so that the can is closer to the side of the stencil you want to be that color. It takes some practice but it is really not that difficult and looks really cool.
I also made stencils for McQueen's signature lighting bolt and the logo on his racing tires, you can use the links below to access them.
I masked off different areas to paint details like the exhaust pipes, and the bolts on the hood. For the headlights, I did something a little different.
To start out I masked them off and painted them silver.
I then used a post-it and piece of paper to make vertical lines of white paint, and was careful to use a little bit of my fade effect.
When that was done I used my paper to mask off the middle and added just a touch of white in funky angles to the edges.

To finish off, I masked off half of the light, and painted that yellow, and used a post it note, and sprayed a touch of orange before moving the note down and repeating to get a few shades of orange that weren't quite blended. Finally, just a touch of red completed the look.

To make the eyes I used a circle stencil to paint a black pupil, and then masked that off before adding dark blue to the top of the iris, fading down to white. To make the eye really pop blue I used blue acryllic paint mixed with clear acrylic medium (you can pick this up at any art or craft store) over the bottom white part, so the white shone through which makes the eye look less one-dimentional. Streaks of darker blue with just the acrylic paint on a little detail brush help the iris look even more multi-dimensional. When that was complete, white spray paint and paper stencils gave it that final touch.
I used the logo from the hood stencil to get the spoiler decorated and re-painted the black seat as well as the windows and wheel before adding a clear coat to make it all uniformly glossy.
I did it all in my garage so my son wouldn't see it before the big reveal. His reaction was great!


Comments
Post a Comment